Tuesday, November 9, 2010

Making new tools for the wood lathe part 2 - refining the blanks

I am now at the stage where I am satisfied with the basic shape and can move on to the heat treating.
Because it is so labour intensive and messy for just 2 tools I am going to send these out.
Basicially the technique is to wrap the steel then slowly bring it up to a temperature where the metal becomes ductile and the grain structure can be re aligned. It is held at a specific temperature for 1-3 hours then slowly cooled and quenched in hot oil to give the metal the hardness and ductility required.
I am trying for a RH of about 6200.

Heres a shot of the tools ready for the heat bath:
lathe-tools-7

Here's a close up showing the shape of the tips: The more finishing I do now the less labour intensive it is after heat treatment.
lathe-tools-6

Finally here is a close up showing the taper I ground into the steel to allow the tool to pass through the kerf as it penetrates into the depth of the wood without binding. I wanted a strong tool so I made the depth 1-1/4" and the back is 1/8". I don't want any chance of it bending in the cut at 300-500 rpm.

parint-tool-1

Making new tools for the wood lathe part 1

I never seem to have the right tool for the job at hand and most are easy to make if you have a few tools.
I use a power hacksaw and or a dedicated Beaver table saw to cut/grind out a pattern then refine that on the bench with a power grinder.
The pieces are made from "01" tool steel and tempered after the refining process to keep a decent edge for turning
I will try to add pictures as I progress with these tools to show you all the steps.
The metal is prepacked in 3 foot lengths and usually gives me enough material for up to 4 tools with tangs.
I have been buying it at a franchise store called "Metal Supermarket":http://www.metalsupermarkets.com/s.

You can search the web for one nearest you if you get the bug.

lathe-tool-fab1

Here is a picture of the cut off disk I prefer and a tang that was cut with on of them with my cut off saw.
Ask for these by name at a welding shop or similar. They are tougher and last longer than other brands I have used.

zipcut3

*Dont use them in your tablesaw for fear of igniting the wood dust*.
I have a separate old saw I use just for this cutting and slicing
cutoff-saw
I recently aquired this little metal bandsaw which has really been a good investment for me.
I seem to use it more and more now that it's so handy. Bolts, bars, slots and all kinds of things that just come up around the house and shop and have no easy solutions.
m-bandsaw

Cost me about the same as a couple of batteries for my electric drill. (smile)
It has a small attachment that allows me to use it vertically for cutting stock like a conventional bandsaw.
p.s. that way I could have avoided the nicks at the ends of the cut on the tangs shown here.

A cradle for changing router bits on a Triton router

I got tired of chasing my big router around the bench when changing bits or setting depth of cut so today I grabbed a piece of 1 x 4" and a chunk of 1/4" mdf and made a cradle.
I traced around the router and cut the MDF out in a rough pattern on the bandsaw then tuned it a bit with the spindle sander.
From wood stuff 2009
Next I put a brace inside to support the router top and covered it with a bit of foam to prevent scratching.

Heres the finished cradle held on the bench with a couple of clamps.

From wood stuff 2009

I can reef on the change wrench without having to embrace the tool each time I change the bit.

From wood stuff 2009

Could have been fancier but it works.

Bob

A landing apron for your miter jig.

I have trouble with my tablesaw not having enough room back of the blade to allow me to pull my miter sled back to cut panels.
I have a dedicated sled but sometimes I just need an inch or two without setting up another jig.
I made this apron from scrap that fits in the fence slot and lets the miter travel off the table and still slide forward for the cut.

From shop pics 2009

There is nothing much to say as it just pops into the slot and away I go.

From shop pics 2009

This shot shows about 22" behind the blade - plenty of room for most cabinet doors.

From shop pics 2009

Tweaking the Leigh Dovetail jig for my shop (DR4)- upgraded

I have had this Leigh dovetail jig for more than a year and have yet to tune it so I can use it.
From wood stuff 2010
When I first got it it was an old D4R so I upgraded the clamp mechanism and added a bit of adhesive sandpaper to the clamp bars.
The first couple times that I tried this machine I found that the wood wanted to slide under the clamp bars so I put sandpaper strips to control that .
I also had difficulty the 1/4 inch shank bits that I had on hand were sliding out of the collet adapter and spoiling the joints.
I replaced the collet with a new one from Lee Valley and purchased *8mm shank* bits as well as an *8mm adapter*.
I'm surprised how much better this combination seems to work in my router.
It makes me wonder why the industry ever produced quarter inch bits as they have been a pain in the ass since I started woodworking.
My "go to" router has become a Triton three and a quarter horsepower machine which has all the right features but of course, with a large motor, becomes a bit of a behemoth to move back and forth on the job.
From wood stuff 2010
"So I decided to treat myself and purchased sliding vacuum system and extension table from Lee industries.":http://www.leighjigs.com/vrs.php
From wood stuff 2010
Essentially, it's a long smooth sheet of aluminum fixed in place by 4 rare earth magnets. On the underside they have attached a vacuum that slides along as you route. The end result is no more sawdust in my socks a convenient table to rest my router on and keep it level during the machining process. the two wire arms adjust to fit any router and the entire mechanism slides like silk with the addition of a bit of wax to the surfaces.

While setting the jig up to do a few test pieces I noticed that the fingers had several small imperfections from the casting process that made my router stall and catch in places in places making movements back-and-forth a bit jerky. I put a fresh piece of 180 grit sandpaper in my palm sander and gave all the mating surfaces a light buff. Just enough to remove imperfections.
I then gave the entire mating surfaces a light coat of Johnson paste wax to the base of my router.
The router slides on the table with one hand now!
From future projects 2010
Next I cut some pieces pine 1 x 4 and ran a couple of test joints shown here.
From wood stuff 2010
These joints are not perfect but they do show me that I'm on the right track.
The attached vacuum makes it extremely simple to rest the router between passes. I used to have to lift it over top of the jig and set it down between each pass.
From wood stuff 2010
Rather than try to hook up the Vacuum line to my central dust collection system from a 1 inch intake line I chose to use a small shop shopvac located on my storage shelf and operate the on/off switch with this auto switch so that each time I turn the router on the vacuum automatically goes on and runs for an a additional 10 seconds after I switch it off
From wood stuff 2010
.

pimping out an import wood plane

I figured it was about time I tried to tweak a new plane. These planes were made in India, under the award brand, but they look very similar to those made by "Groz Industries":http://0168a51.netsolhost.com/index.cfm?MainDisplay=Products&SubDisplay=ProductDetails&ProductID=363. , "Ambika,":http://www.ambikaforgings.com/Planes/indexPlanes.html and "Anant tools":http://www.anant-tools.com/iron_bodies_bench_planes.html etc.

I purchased these three planes at a local store here for from $15.00 to $40 each.
Having attempted to restore several old Bailey's and Sargents and Stanley's I found that
lately the prices on E-bay for vintage tools has been tarnished by extremely high shipping costs and the inevitible "padding" of the price by shady merchants. And to be quite honest, in my opinion, they were not made all that well in the first place. (Your milage may vary)

Right out of the box, these all performed much better than my expectations and required no adjustment of the plane bases and or blade fittings. The castings, seem of very high quality, and did not require any adjustment.

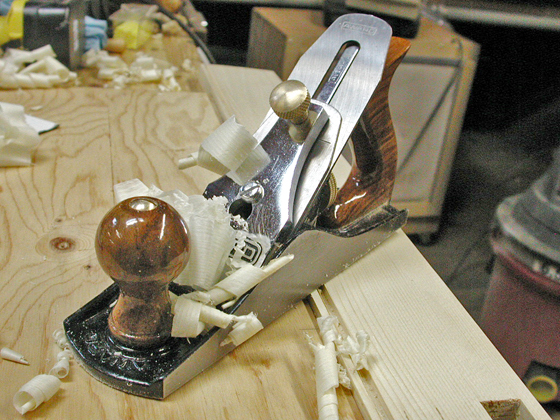
I sharpened the blade in the No.6 plane (18" long), and used it on several different species of wood and was impressed with how well it cut.
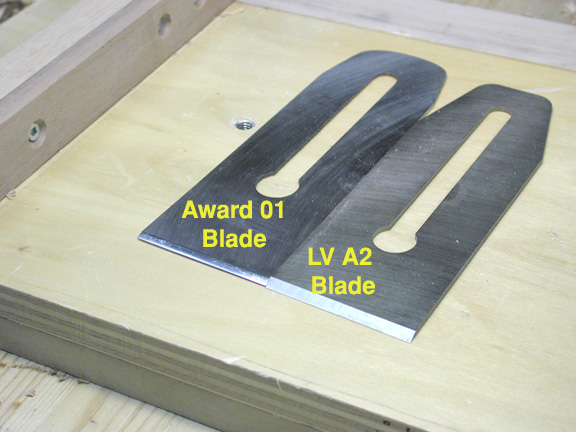
I was curious to find out what improvement a *high end blade* would make with this plane so I ordered a new blade from Lee Valley made from A2 steel.
As you may know, A2 steel is much harder than 01 carbon steel and although more difficult to sharpen it keeps an edge longer. I have a "Worksharp, sharpening system ":http://lumberjocks.com/jocks/boboswin/blog/2399 so I was not too concerned about the extra work in sharpening this type of blade. As shown in the picture the Lee Valley blade is considerably thicker than the original. Lee Valley claims this extra thickness helps prevent chatter from the blade.

Next I removed the blade and chip breaker and gently filed the frog so that it was continuous with the angle formed in the sole of the plane. It went fairly quickly, as there was negligible material that needed to be removed.

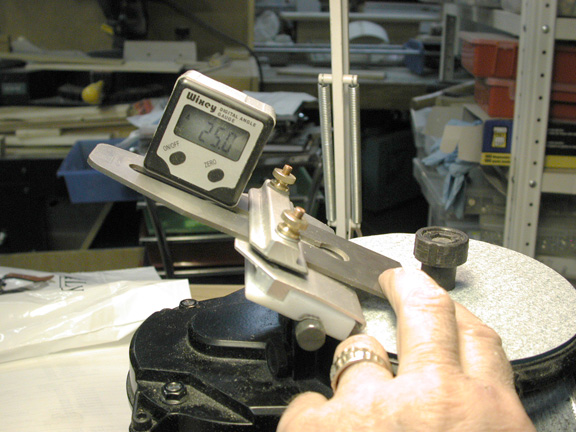
Next, I set out my sharpening station and set the blade angle to 25° using the wixey gauge to get an accurate angle.


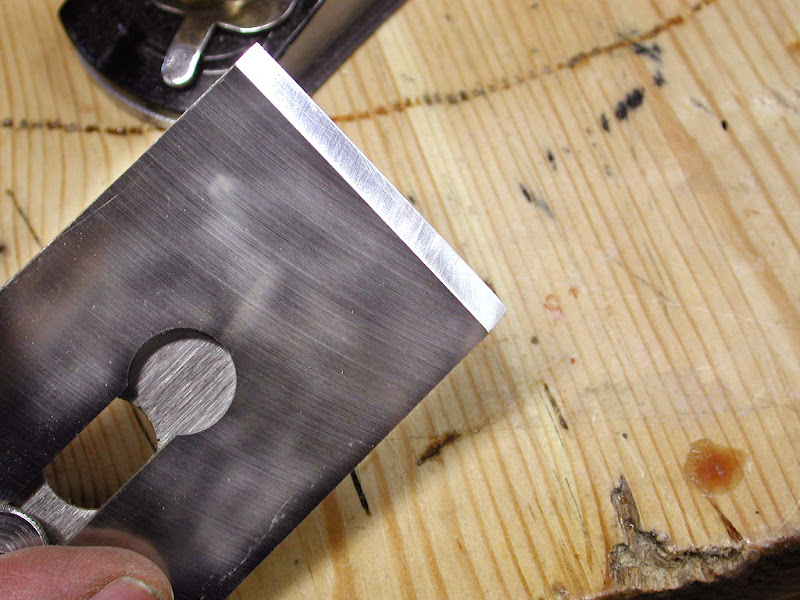
The next shot shows the blade, as it comes off the Worksharp system.


I reassembled my plane and tested it out with a handy stick on the shooting board. The new blade got noticeably smoother than the original and the additional thickness narrowed the mouth of the plane leaving just enough room for those fine shavings to exit.


I'm very satisfied with this modification to the original plane and hope to modify the other two in the weeks to come. I will admit that the new blades actually cost more than the original plane. But all in all, it turns out to be very good value.

I am the first to admit that they are not the same quality as a Lee Valley or a Lie Neilson but they will certianly do until I win the next lotto.

Sunday, November 7, 2010

Narex mortise chisels Good value good tools.

I bought a five piece set of Narex mortise chisels and so far have had an opportunity to actual work with one.
I'm quite pleased with the fit and finish and this steel quality which seems to be just right for my liking. Not too brittle, takes an edge quickly and seems to sharpen without leaving too much curl on the cutting-edge.(Rc59) They have a nice weight to them in a nice feel in my hand and the blades are definitely long enough to be able to hold the blade in alignment while gently tapping the butt to form the mortise.
From narex mortise chisels

I'm a bit short of time this weekend for various reasons so I gave the half-inch chisel a bit of a flattening on the back and re-honed the long bevel edge on the front so I could try the chisel on some wood today.
From narex mortise chisels


I grabbed a piece of 2 x 4 Spruce stock , flattened the top with a Jack plane, and dropped the mortise with her one half-inch bit in my Triton router.
From narex mortise chisels

As shown in the following picture the half-inch mortise is an excellent fit to the half-inch router bit I am using and it actually took just a few seconds to square a each end of the of the mortise.
From narex mortise chisels
This is a picture of the finished mortise and although it is not a textbook example using a hardwood it has given me confidence to go ahead and finish honing the other four chisels.
From narex mortise chisels

The set consists of a 3/16, 1/4, 5/16, 3/8, and 1/2" chisels.
They come as shown with blade guards but do not include a fancy case which I generally end up tossing out anyway.
They're modestly priced and a pleasure to work with. I found mine at the Valley tools and I do understand that this brand from Czechoslovakia is also available at Highland woodworking in the US.