Sunday, December 5, 2010

I needed a jig to allow me to cut consistent thin strips away from the fence and the potential for binding and possbly nicking the fence. I have the Grr ripper but sometimes need a strip too narrow for this jig.

I saw this in Shopenotes or similar and never got around to making it.
It's really simple and only needs a routed slot and a bolt to carry a small bearing on the nose.
From THINS STRIP TS JIG

I picked up the miter slot fittings from Workshop Supply here in Canada.
You can fine tune this with measuring bars and cut strip after strip just by moving the fence in to the bearing surface.
From THINS STRIP TS JIG

From THINS STRIP TS JIG

From THINS STRIP TS JIG

From THINS STRIP TS JIG
If you use the Grr ripper you can set it way back and set the gripper up ahead of it to carry the cut through the blade.

Bob

Wednesday, December 1, 2010

Small hinge mortise jig

I've been struggling with fitting brass hinges into softer woods that I seem to work with today against my better judgment.
By the time I have the mortise cut for the hinge I find that usually a portion of the mortise has either fallen away, been crushed by my chisels, or a combination of both leaving an unsightly gash into which I have to place my hinge.
I've been looking at this jig as outlined in ShopNotes volume #12 No. 74.
From hinge jig
From hinge jig

From hinge jig
From hinge jig

The principle of this jig relies upon your router having a square base with exact sides. In my case I am waiting for a new router and used my roto zip that happens to have a 4 inch base attached from a previous job.
The jig relies on the four-inch base and the use of 1/4 inch carbide router bit to shape the mortises.

From hinge jig

The first thing you need to do is determine where you need your hinge to sit in the wood. I laid a couple of hinges up as shown and marked their positions with a sharp pencil.
From hinge jig
Next I opened the gate on the jig and fitted each hinge to the exact opening. Next the depth of the hinge was set using a side gauge on the jig.
From hinge jig

Once the frame is lined up with the dimensions of the hinge the depth of cut is set for the router bit to match the thickness of the brass hinge being used. I actually made the mortise inset slightly deeper than the hinge so I could lightly sand away the milled edges giving me a cleaner mortise .
The last picture pretty much speaks for itself.
As shown, a 2 1/4 inch mortise on the left and the three-quarter inch mortise on the right and both are more than acceptable by my standards.

From hinge jig
You can watch a demo of this jig here:
http://www.shopnotes.com/issues/74/videos/using-the-hinge-mortising-jig/

Tuesday, November 16, 2010

mortises on the router

As usual, I'm looking for an easier way to do a task when I'm woodworking.
Every so often I find myself needing to do more to some mortise and tenon joinery and have often thought that I wanted a dedicated mortiser.
My first big problem is I simply don't have room for another machine in my shop the second problem is I’m basically lazy and I just hate ten minute set ups for 5 minute jobs.
I was reading Bill Hiltons great book on using the router and I noticed that he had shown the router set up with two fences.
Eureka!
I have two fences!

I skipped out to the shop and grabbed a couple of pieces from the scrap pile and milled and faced them as shown here:

From router fence mortise

I clamped the big board in my vice and marked off a couple of spots for my mortise.


From router fence mortise

I grabbed the router I had that had two identical fences available and slipped one on either side of the guide rods.

From router fence mortise


Next, I dropped the router on the board clamped in my vice and lined it up with the previously drawn centerline. Because the fences are adjustable you can position your mortise and tenon anywhere along the edge of the material With really narrow material just use acouple of spacers on each side of the piece to be morticed.

From router fence mortise

From router fence mortise

From router fence mortise

I tried a couple of passes on the test base to get the feel for this rig and then proceeded to cut the tenon over on my table saw. After having a rather dismal result truing the shoulders of the tennon using my Osborne miter gauge I discovered that there was some play in the miter stop and that was preventing me from getting an accurate shoulder all the way around the tendon. A small turn with a spanner wrench and we were good to go.
I should mention that I did use a dedicated tenon device on the table saw to exactly position the tenon for proper fit in the mortise.

From router fence mortise

From router fence mortise

Here is the final result and I am pleased with the fit and the overall time it required to make this joint.
I am estimating that including scouring out the mortise with a chisel and cutting the tenon that my working time start to finish should be in the 4 to 5 minute range. What I like best about this system is it required no additional purchases apart from an extra fence guide and requires no specific footprint in my small shop.

Thursday, November 11, 2010

Restoring an old 6" jointer - Delta Milwaukee 37-207 #1:

A couple of weeks ago I rescued a an old 6" Delta/Milwaukee jointer from a Garage sale. ( Circa 1940's)
The fellow I bought it from was mostly into old cars and had no use for this iron and it sat rusting in his way. We made a decent deal and I lugged it homeward.
The surfaces of the in and out feed table were rusted and pitted and I did think about having them re honed at a machine shop but first I felt it better to run it to see what else was wrong.
About and hour with some rust remover from Lee Valley and I had the vital parts soaking overnight in dampened paper toweling or immersed where practical.
With a bit of elbow grease and some metal finishing pads on the electric drill I was able to get an acceptable surface on the tables.
From delta 37 207 jointer

At this stage I was confident that it could be put back in service. bearings good, tables flat, belt not so good,
pulleys, out of round and too small for the 3/4 HP motor.
After some help from the guys here I figured out the ratios for the upper and lower pulleys and swapped the drive system over to "Vee" belts which are wider and tend to run smoother.
I have a 2-3/4" pulley on top and a 6-3/4" pulley on the motor which should give me around 4000 RPM . With the 3 blade cutter head I will be getting close to 12,000 cuts per minute.
To get the motor to hang properly off the belt I had to rig up a hinge plate for the motor to sit on attached to the frame and on the unhinged end I made an adjustable rubber covered motor mount that I can set to take tension off the bearings and still drive the cutter head.
From delta 37 207 jointer

From
The next thing I wanted to address was the short bed length and fortunately the out feed casting came with a hole in the end allowing me to put a tenon in the space .
It was a bit of a trial and error as the inside of the casting was neither smooth or parallel.

At any rate, I came up with this:
From delta 37 207 jointer

Today I worked on putting a removable stabilizer leg under the extension and am fitting the sweep under the carriage to attach a dust collection hose.
From delta 37 207 jointer

From delta 37 207 jointer
For what it's worth the old iron seems to cut extremely well and will serve me for what I need.

Wednesday, November 10, 2010

I have had this Leigh dovetail jig for more than a year and have yet to tune it so I can use it.
From wood stuff 2010

When I first got it it was an old D4R so I upgraded the clamp mechanism and added a bit of adhesive sandpaper to the clamp bars.
The first couple times that I tried this machine I found that the wood wanted to slide under the clamp bars so I put sandpaper strips to control that .
I also had difficulty the 1/4 inch shank bits that I had on hand wsliding out of the collet adapter and spoiling the joints.
I replaced the collet with a new one from Lee Valley and purchased *8mm shank* bits as well as an *8mm adapter*.
I'm surprised how much better this combination seems to work in my router.
It makes me wonder why the industry ever produced quarter inch bits as they have been a pain in the ass since I started woodworking.
My "go to" router has become a Triton three and a quarter horsepower machine which has all the right features but of course, with a large motor, becomes a bit of a behemoth to move back and forth on the job.
From wood stuff 2010

"So I decided to treat myself and purchased sliding vacuum system and extension table from Lee industries.":http://www.leighjigs.com/vrs.php
From wood stuff 2010

Essentially, it's a long smooth sheet of aluminum fixed in place by 4 rare earth magnets. On the underside they have attached a vacuum that slides along as you route. The end result is no more sawdust in my socks a convenient table to rest my router on and keep it level during the machining process. the two wire arms adjust to fit any router and the entire mechanism slides like silk with the addition of a bit of wax to the surfaces.

While setting the jig up to do a few test pieces I noticed that the fingers had several small imperfections from the casting process that made my router stall and catch in places in places making movements back-and-forth a bit jerky. I put a fresh piece of 180 grit sandpaper in my palm sander and gave all the mating surfaces a light buff. Just enough to remove imperfections.
I then gave the entire mating surfaces a light coat of Johnson paste wax to the base of my router.
The router slides on the table with one hand now!
From future projects 2010

Next I cut some pieces pine 1 x 4 and ran a couple of test joints shown here.
From wood stuff 2010

From wood stuff 2010

These joints are not perfect but they do show me that I'm on the right track.
The attached vacuum makes it extremely simple to rest the router between passes. I used to have to lift it over top of the jig and set it down between each pass.
From wood stuff 2010

From wood stuff 2010

Rather than try to hook up the Vacuum line to my central dust collection system from a 1 inch intake line I chose to use a small shop shopvac located on my storage shelf and operate the on/off switch with this auto switch so that each time I turn the router on the vacuum automatically goes on and runs for an a additional 10 seconds after I switch it off
From wood stuff 2010
.

Tuesday, November 9, 2010

Making new tools for the wood lathe part 5 Finishing the handles and mounting the blades

Once the first handle is finished I cut it free from the stock and re center the tailstock on the remaining blank.
I will now refine the handle shape except for the part in the jaws and fit the ferrule.
p.s. The tool mark BEDAN is actually a bead scraper - my bad . A bedan only has one side sharpened.
handle 8
Once the ferrule is fitted, I wrap electrical tape around it about 4 times and remount the handle the other way around to finish the back end. I generally use a small skew to sneak up on the tail stock point then finish the remaining coat of lacquer over the entire handle. I use lacquer becausee it seems the most durable for this stuff and doesn't warm up in use and get sticky.
handle-9
handle-10
I will let everything dry for 24 hours then fit the shank of the tool on by placing the blade in my vise and tapping the handle home with a rubber mallet.
Here are the two tools finished except for some epoxy resin in the spacing left from drilling the handles.
handle10
As the need presents I will quite often make up a tool in a hurry promising myself to remake it "cosmetically" in the future but that never seems to happen.

Here's a few that I have made for various tasks:
handle-11
The top two are the ones just made and the others are scrapers and similar.
The bottom one is a file contoured to produce a continous shape on a bowl I was developing.
The one with the round shaft in the middle I used for cutting an ironwood box. I brazed on a carbide tip on that one.
Just to finish this segment, I grabbed a piece of Manitoba Maple (Box elder), fresh cut and mounted it on the lathe to try the skew/gouge.
handle-12
Mountains of long curly ribbons of beautiful smelling wood shavings.
*I love turning this wood green!*
Next I grabbed the new skew gouge and it works well to make continous beads with the advantage of being able to top the beads with the same tool.
I must try it on dry wood to see how it planes the surface.
It wanted to take too much off on this wet stuff.
My bead technique needs some practice as the beads I made in my excitment look more like mushrooms!
handle-13

Making new tools for the wood lathe part 4 turning some handles

We have finished the hardening process and cleaned up the blades ready for handles.
The 2 tools in his blog are used with a lighter touch and so I went for a shorter handle that I could get a friim grip on an still control easily. As you can see I like big thick handles - my hands are quite large.
I had some dogwood blanks in my offcut bin so I used a 15-1/2 " piece for these handles and mounted the whole length to avoid loosing any during refining.
Here is the blank roughed out to start the hole for the tool shank.
handle1!
Next step I put on my old spindle steady rest to hold the handle centered for drilling a hole to recieve the tool shank.
It's just four sealed bearings running on pieces of miter track in a piece of plywood. (baltic birch.)
Seems to do the trick but you have to watch for tracks from the metal bearings .
It's on my list for a remake as I cobbled this one together for this job. It was off and old 12" swing lathe I had for a few years and I just never got around to making a new one.
My new lathe is 16" swing so I needed to modify the base a bit.


handle2

Making new tools for the wood lathe part 3 - Heat treating the tool blanks

Well, some disappointment for me this week:
After checking some metal heat treating companies here I find that they have (understandably) a $60.00 minimum for processing materials. The sort of leaves us little guys out unless we have a whole batch of tools to do at one time.
This has never been my good fortune.

So, luckily I had a casting furnace sitting around for years with nobody asking for one so it is now pressed into service as a heat treating unit.
heat-treat-1

Showing here is the furnace with a stainless steel umbrella stand and small electric heater to preheat the canola oil for quenching the red hot steel. You can use any oil wth a high flash point ( over 400° F and you should be O.K. . ( motor oil will work but I dont' like the smell ) Olive oil corn oil etc etc.

The umbrella stand was fluke that showed up at my local Princess Auto store this week.
I leaks a bit but I will sweat a bit of silver solder around the bottom seam when I have time. ( Another poorly made, great idea from China!)

I needed something taller than my tool steel to prevent spattering - with fiddling, this will work, the heat required is less than 300° F so melting the solder out is not a problem.

heat-trea-3

This shot shows the two tools I'm making with monel wire leads through drilled holes to dip the hot iron in the canola oil . (This wire was scrounged from the old wire style heating elements from electric stoves.
I could do this with tongs but the wires make it easier to handle the pieces .
Were ready to go so I take the temperature up to 1450° F and let the tools soak at this temp for 20 minutes

heat-treat-4.

Now I take them out of the furnace and quickly into the hot oil to quench the steel.

Next step is to clean off the thick black scale with a rag and rinse off the residual oil .
When the furnace drops to 350° I put the tools back in and hold that temperature or 2 more hours to take the brittleness out an give the steel some resilience.

heat-treat-5

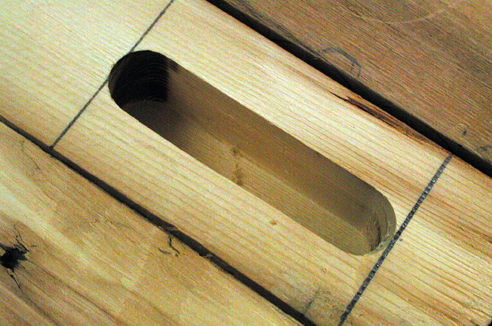
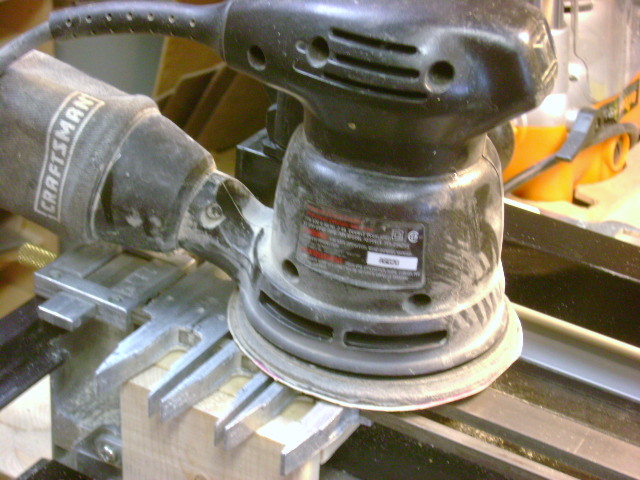
Here's the result , all mottled and looking like junk but hopefully a few minutes with some abrasive and they will be ready to recieve their handles then back to the wood lathe.

Before I get everybody thoroughly confused I should give you some definitions of the stages of metal we are interested in here:

*Annealing* - Softening the tool steel for working, by heating to the hardening temperature and cooling slowly. Slow cooling can be accomplished by burying the steel in an insulating medium such as lime or vermiculite and allowing it to cool to room temperature.

*Hardening* - Heating the steel to the hardening temperature and cooling suddenly by quenching in an oil bath.

*Tempering* - Reheating the hardened steel to the tempering temperature in order to relieve stress induced in the hardening process, and remove some of the hardness in exchange for toughness. Untempered, hardened tool steel is nearly as brittle as glass.