Tuesday, January 18, 2011

Making an Octagonal Bird feeder.

I haven't blogged before so bear with me while I find out where the rocks are.

It looks like I managed to get pictures in here so here goes the story:

BTW, that is a Downey woodpecker doing a close up investigation.

I have been fussing with critters all my life and birds are among my favourites.
By attracting them I gain the benefit of their company and the side benefit of their constant insect control.
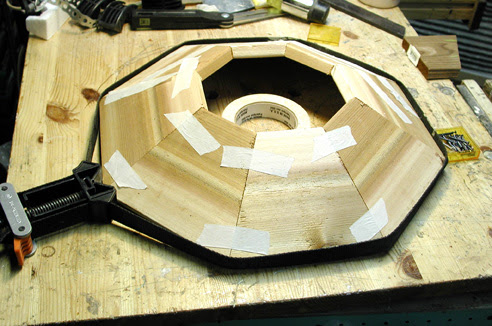
These feeders are 8 sided and fun to build in the shop.
I have found some work arounds for the windows and the feed area that could save you some time.
I like to keep a piece of cut stock from a previous feeder to use as a guide to set up my saw
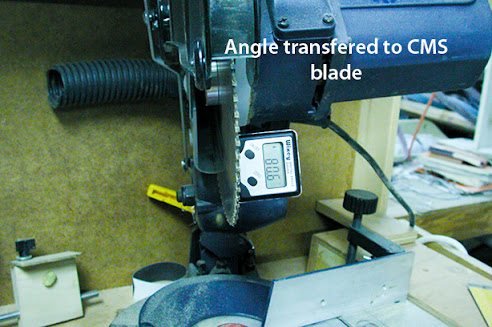
For future cuts but I am finding that this wixey angle gauge is taking a lot of the set up time out of the job.
Now I just set the angle off the number of segments and let the Wixey figure out the compound angle for the saw.
Here's how it works:
1.Take the angle off an old segment as I do here or calculate it from a table.
there are numerous on the net and some in Excel if you prefer.


2. Set the Wixey on the saw table and zero it out.


3. Using a steel miter gauge set the Wixey on it a measure the angle difference vs the table and the gauge.
Transfer the Wixey to your saw blade and set in the same angle you got from the bevel gauge.


The diameter of your roof will vary with the stock you choose but the angle of slope will remain the same.

4. Saw up 4 pieces and set them with masking tape against a flat board and check your fit.
Adjust if necessary.
If they are a fit, cut the other 4 pieces and get ready to glue them.
You pretty much should use polyurethane glue ( Elmers or Gorilla for example) to get a weather proof seal as Most of the joints are end grain and will be sitting in moisture alot.
Wear gloves with this Stuff, it stains your hands.
Use it sparingly and spray the glued surface with water to hasten the cure.
I apply the glue on one surface and wet the mating surface.


to be continued...

Sunday, January 16, 2011

Thin strip table saw gauge

I needed a jig to allow me to cut consistent thin strips away from the fence and the potential for binding and possbly nicking the fence. I have the Grr ripper but sometimes need a strip too narrow for this jig.(1/4" minimum)
From THIN STRIP TS JIG

I saw this in ShopNotes or similar and never got around to making it.
It's really simple and only needs a routed slot and a bolt to carry a small bearing on the nose. I picked up the miter slot fittings from Workshop Supply here in Canada.
From THINS STRIP TS JIG

From THINS STRIP TS JIG
You can fine tune this with measuring bars and cut strip after strip just by moving the fence in to the bearing surface.

From THINS STRIP TS JIG
If you use the Grr-ripper you can set it way back and set the Gripper up ahead of it to carry the cut through the blade.

Bob

Thursday, January 13, 2011

Working punky wood in a maple burl

These pics tell the whole story.
The fellow that trims my trees around home dropped off this huge burl about 2 years ago.
This is about 1/4 of it so far.

I just keep running out of time .

Time is not my friend.

Bob


Posted by Picasa

Wednesday, January 12, 2011

MAKE a birdhouse from a log and some fence board

Here's a "project" for a rainy day.

http://members.shaw.ca/boboswin/public/birdhouse%20project/Birchlogbirdhouse/

Bob

Here's a "project":http://members.shaw.ca/boboswin/public/birdhouse%20project/Birchlogbirdhouse for a rainy day

Tuesday, January 4, 2011

"These pics tell the whole story":http://www.members.shaw.ca/boboswin/public/Burlcuttingtechnique/

The fellow that trims my trees around home dropped off this huge burl about 2 years ago.
This is about 1/4 of it so far.

I just keep running out of time .

Time is not my friend right now.

Bob

Bandsaw log sled and resaw fence for any bandsaw

I cant take credit for this design but after chasing around the internet for a while I landed on this simple solution.

I believe Mike in Paradise Newfoundland may be the originator.

It's just a cradle with a parallel "keel" to fit into the bandsaw miter slot.
It uses a 1/2" pipe clamp as the log gripper.
*One caveat:* the logs are heavy and can tilt the BS table. I will be cutting a support stick for under the table shortly to prevent this.
I will also be drilling some additional holes to reposition the bar clamp in the cradle ends as the need arises.
To set the depth of cut I just set my fence to the correct width and slip the first end of the log up to it then pass the entire log past the blade and set the back end.
p.s. I should have used my 3/4" resaw blade but forgot to change it in my haste to make shop time more valuable


Well it didn't take long to find out that I needed an out feed table/slider on these logs. They are quite heavy and difficult to handle by yourself so I rigged up this slider that rests on top of my outfeed table for the table saw.

Here's a different shot of it in case you want to copy me .
The frame is notched to fit the miter slot on my bandsaw table and I attached it using a spring clamp for now.

The actual sled lines up with it and slides into a trough to keep it lined up when it exits the blade.

Here's shot of the rig packed up for storage I wanted the outfeed to nest in the sled to save space and it does .

I still have to modify the bar clamp and stabilize the bandsaw table for the additional weight but the hard stuff is done now.
Here's the modification to the bar clamp with one of two screws in the steel plate dangling down in front of the adjustable end of the bar clamp. I am trying to prevent rotation of the log during movement.
p.s. the screws are ground to a dull point

I also added an led light to the setup today using a flexible book light and a couple of magnets in a block of wood. I have to remember to turn it off though.

Heres a shot of the light in place on the saw.
They are really inexpensive now and this one came with 5 extra batteries.(All for a buck!)

Now we are going to need a* resaw fence* for the slabbed lumber and the exotic stuff from the lumber vendors.
I just used scraps of this and that to build a box over the bandsaw fence to extend the height .
This should prevent cutting "wedgies".
Here's a shot from the back side showing how it sits over the fence.
On Saturday I will get some slotted nuts to secure it when I'm slicing.
I deliberately used MDF for the face of the fence as I have found it more stable than other solutions.


Here you can see a test piece sliced into three.
I ran the piece through the saw a couple of times to give myself a flat bottom to run past the blade and slipped it through with a push stick at the end.


The last shot shows the three pieces flat on the table.
The light I rigged up yesterday is comming in quite handy.


a simple plane for a site level.

This is such a simple project I hate to bother you with it but I thought it might be the kind of project that may stay in your family.
I spent about 10-12 dollars on parts and the rest took about a 1/2 hour in the shop.
If you have a WW buddy it could get you some brownie points around x-mas or Ramadan or YK or whatever.

Cheers Bob

What? another birdhouse?

From teaching kids
Can't say too much here but it a little project I did with my grandson to get him interested in woodworking.
Click on the red text above to follow us on this one.

Birdhouse from a log with the help of a wood lathe

Here's a simple way to build a birdhouse from a bit of firewood and some fence board scraps.
Just click on the red writing for a pictorial.

An oval hand mirror

I have been wanting to try one of these for a while now and got the first pattern off the paper in into wood today.
First thing to do is determine how much border you want to encircle the mirror and then cut and accurate pattern of the actual glass to serve as a template for your router inlay kit.
From mirror oval

I sticky back taped the mirror to bandsaw a piece of 1/4"MDF and trimmed it to the shape with a bearing guided router bit.
From mirror oval

Next step was to refine the mirror back template so the oval would line up with the axis of the handle.
Once the recess for the mirror was routed the body could be cut out on the bandsaw and refined
From mirror oval
The thickness sander brought us to the right thickness and refined the surfaces.
From mirror oval
A light skip around the router table witha round over bit and we are starting to see daylight.
From mirror oval
The mirror seems a good fit and the bezel looks relatively even round it.
From mirror oval
here's the back with the mirror out on the side.
I am contemplating an inlay for the back to kind of dress it up a bit.

From mirror oval
... to be continued.

A slab Gage for the Band saw log slicer/Resaw Jig

Not long ago I reported on a method to "re saw fairly large logs on the band saw":http://lumberjocks.com/projects/2400.
The system works great with one exception:
It takes too long to orient the next cut.
To improve this situation I made yet another jig that I place the BS sled on and Line up.
bs-sledging

As you can see there is a vertical fence that can be adjusted from zero to about 4-1/2"
bs-sledjig3
I can now parallel the cut face to the fence , and quickly set the width of cut and keep the cut face parallel with the saw blade.
bs-sledjig4

This last shot shows a piece of wood slabbed off at 5/4 thickness . I will plane both sides now and split it again on the bandsaw to get to my final width of 1/2".
bs-sledjig6

Finally, a Shooting Board of my very own!

After seeing the neat job that "MOT/ Tom did with his shooting board":http://lumberjocks.com/projects/3003 I was enticed to make one of my own.
I am in the middle of milling some wood for small boxes so I will needed something to handle these small gauge materials.
I am a pack rat and wood hoarder by genetic make up so when I dug through one of my precious piles of scrap I found an old poplar plywood shelf, a piece of arborite (Tom's idea) and a piece of 3/4" fir flooring plywood.
The rest were off cuts of oak walnut etc that would have been firewood.
Once I milled the stops to dead flat and square the rest went fairly quickly.
You have to get the stop lined up with the shooting edge at or very near 90 degrees and the shooting edge should be almost perfect in length and vertical as possible.
The reason I split the stop in two pieces was to allow for an alignment should the need occur.
I can shim the walnut piece on either end to shift the workpiece to plumb.


Once the board was assembled I could use my plane to flush trim the stop block and align the guide edge up to the stop block. Tom was right about the arborite under the plane ,it really reduced the drag, I had to cut a 1/2" relief under the top board to let the arborite slip under for a good fit.


shoot-brd-1

Next I tested with my low angle block plane. Not a really good one but it does the trick.
It cut the African black wood like a butter knife and gave me a nice sharp 90 degree angle.

shot-brd2

Next I made the 45 degree attachment for lining up flat boards as per picture frames and box corners etc.
These have to be dead on so take your time if you are making one of these.

shooting-brd-45-att
The final shot was a jig to get 45's on the bevels . I have always had a problem with this cut and spent many moons sanding the wood until it was too short. I'm hoping this jig will eliminate a lot of that.
shooting-brd-45-bevel
The next step is to get some decent plane irons so Mr. Hock will be getting a call soon.

Here are "references for the plans I used":http://www.woodskills.com/Tutorials/ShootingBoardPlan.html   http://www.woodskills.com/Tutorials/ShootingBoardPlan.html

Enjoy

Bob

Simple divider for centering cuts on edges of common boards.

Finding center can be frustrating when you are in the shop and need a quick way to place a biscuit or dowel or mortise.
This simple math trick does the job for you.

Drill two holes in a piece of 3/8" thick stock that are 2" a part and exactly the size of your selected dowel material
The center hole should be the diameter of your favorite pencil stock.
All the holes must line up along a straight pencil line for this to work.
Drill a hole dead center between the previous dowels for the pencil.
If it's a bit loose set a screw through the side of your wood to hold it .

That's it!

By placing a dowel on each side of your wood and running down the stock with the dowels touching the sides you will draw a line dead center on the work.
You may want to stack more layers up to hold the pencil so the sharp end doesn't protrude as much.

Enjoy Bob

A larger centering jig for wider stock

After I made the small "centering gage last week":http://lumberjocks.com/projects/3023 I decided yesterday that I could use a larger one as well for drawers and the odd cut on plywood .
I picked up a package of 1/4" brass threaded inserts from Lee valley tools last week as well as a knurled set screw to hold the pencil in place.!http://www.leevalley.com/images/item/hardware/jigfixtureparts/44z0201s1.jpg!
I had a piece of mahogany lying about that had the height and width i needed so I cleaned it up with my fore plane and proceeded to mark the stick out to recieve the inserts and hole for the pencil


 The centering of the inserts was easy using the drill press and a fence to line things up on the center mark from my smaller gage.
To make sure the hole were equidistant from the center I used stop on the fence and drilled the first hole them fiipped the stick round and dropped in it's mate.
the layout took about 15 minutes because I wanted to check everyting but the actual drilliing was only about 5 minutes.


Here's another shot showing how I made the centering pins from some 2-1/2" bolts with the heads sawed off.
I was going to use brass rod for the pins but the Borg needs $18.50 for three feet of 1/4".

What they don't know will kill them.

I layed out the top curve with a french curve and ran it through the bandsaw.

It took about an hour and half of piddling and about 20 mins actual work to make this.


Question... Am I anal enough to put a finish on it?

p.s. The complete project is in shopnotes VOl 15 issue 86 page 24...

Cheers Bob