I started making a small jewelry box few weeks ago and part way through I began to want to dress it up a bit with some veneer material I’ve seen examples on YouTube that were stunning and intriguing so I set out to make one on the style I had seen.
I’ve done some small pieces with veneer but this called for something a little more robust.
I quickly realized that I would need for veneer press and at the very least, a veneer hammer.
When I checked around for the tool I could only find the professional model which I felt was beyond my budget for this single project.
As we all know that’s often the case with us amateur woodworkers.
I had some brass stock in the garage and found a piece long enough to mail for the burnishing side of the hammer.
Using my 4 inch belt Sander I was able to flatten the curve side of the brass rod and carefully grind a triangular burnishing edge on one side. The rest of the project involved turning a couple of handles in making a wood mount to hold the brass insert.
I “freehanded” the cutting of the hammer heads and could have made them more symmetrical but for shop tool it’s good enough.
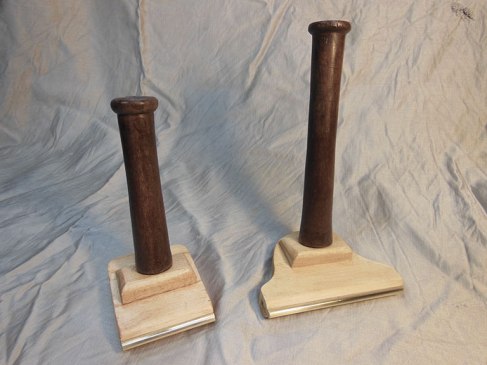
The first picture shows the two hammers side by side.

This picture shows the basic shape of the brass inserts where they contact the veneer.

This picture shows both hammers side by side.
The larger one is 5 1/2 inches wide while the smaller one is 3 inches wide.
I cut a wedge and glued it to the back of the hammer body to offset the handle from 90° to approximately 105°. This just makes it more comfortable to draw the hammer along the veneer.
The corners of each brass insert are carefully rounded and smooth to be sure that they would not cut through the veneer during the squeegee process.
Finally the last two pictures show the materials I used.

1. Three-quarter inch maple stock.
2. Inch and a quarter square mahogany.
3. Inch and three-quarter by 5/16 by three-quarter brass stock.
4.Final picture shows the brass stock as it was ground to size using the belt sander.
