Tuesday, November 9, 2010

pimping out an import wood plane

I figured it was about time I tried to tweak a new plane. These planes were made in India, under the award brand, but they look very similar to those made by "Groz Industries":http://0168a51.netsolhost.com/index.cfm?MainDisplay=Products&SubDisplay=ProductDetails&ProductID=363. , "Ambika,":http://www.ambikaforgings.com/Planes/indexPlanes.html and "Anant tools":http://www.anant-tools.com/iron_bodies_bench_planes.html etc.

I purchased these three planes at a local store here for from $15.00 to $40 each.
Having attempted to restore several old Bailey's and Sargents and Stanley's I found that
lately the prices on E-bay for vintage tools has been tarnished by extremely high shipping costs and the inevitible "padding" of the price by shady merchants. And to be quite honest, in my opinion, they were not made all that well in the first place. (Your milage may vary)

Right out of the box, these all performed much better than my expectations and required no adjustment of the plane bases and or blade fittings. The castings, seem of very high quality, and did not require any adjustment.

I sharpened the blade in the No.6 plane (18" long), and used it on several different species of wood and was impressed with how well it cut.
I was curious to find out what improvement a *high end blade* would make with this plane so I ordered a new blade from Lee Valley made from A2 steel.
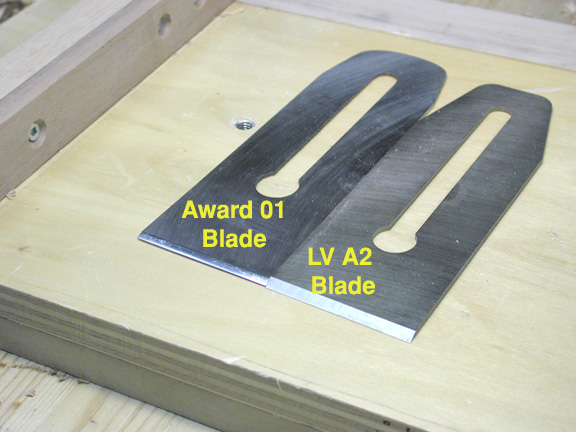
As you may know, A2 steel is much harder than 01 carbon steel and although more difficult to sharpen it keeps an edge longer. I have a "Worksharp, sharpening system ":http://lumberjocks.com/jocks/boboswin/blog/2399 so I was not too concerned about the extra work in sharpening this type of blade. As shown in the picture the Lee Valley blade is considerably thicker than the original. Lee Valley claims this extra thickness helps prevent chatter from the blade.

Next I removed the blade and chip breaker and gently filed the frog so that it was continuous with the angle formed in the sole of the plane. It went fairly quickly, as there was negligible material that needed to be removed.

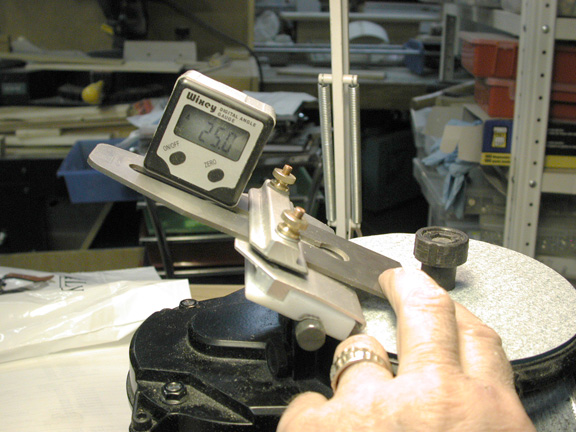
Next, I set out my sharpening station and set the blade angle to 25° using the wixey gauge to get an accurate angle.


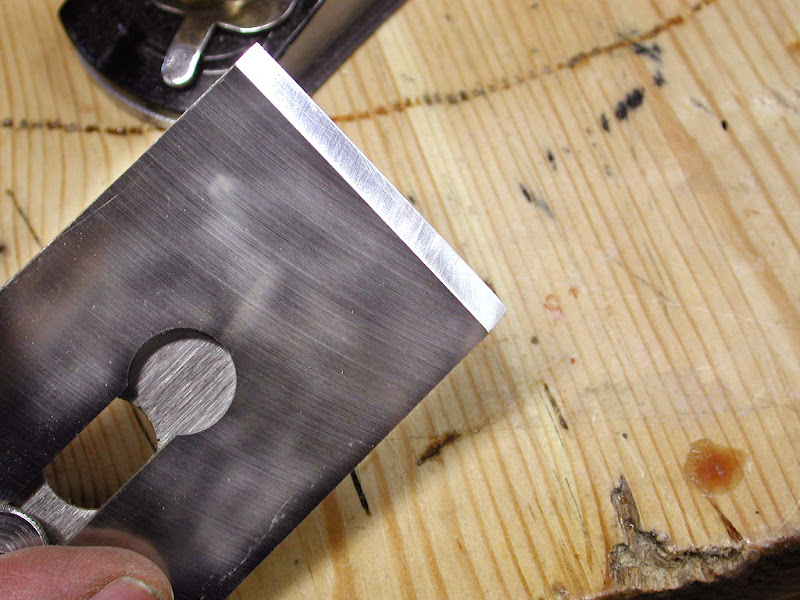
The next shot shows the blade, as it comes off the Worksharp system.


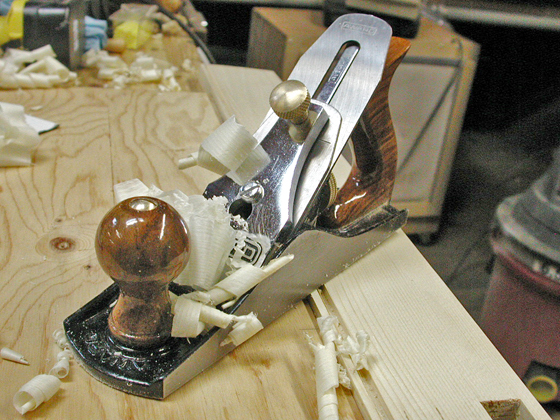
I reassembled my plane and tested it out with a handy stick on the shooting board. The new blade got noticeably smoother than the original and the additional thickness narrowed the mouth of the plane leaving just enough room for those fine shavings to exit.


I'm very satisfied with this modification to the original plane and hope to modify the other two in the weeks to come. I will admit that the new blades actually cost more than the original plane. But all in all, it turns out to be very good value.

I am the first to admit that they are not the same quality as a Lee Valley or a Lie Neilson but they will certianly do until I win the next lotto.

Sunday, November 7, 2010

Narex mortise chisels Good value good tools.

I bought a five piece set of Narex mortise chisels and so far have had an opportunity to actual work with one.
I'm quite pleased with the fit and finish and this steel quality which seems to be just right for my liking. Not too brittle, takes an edge quickly and seems to sharpen without leaving too much curl on the cutting-edge.(Rc59) They have a nice weight to them in a nice feel in my hand and the blades are definitely long enough to be able to hold the blade in alignment while gently tapping the butt to form the mortise.
From narex mortise chisels

I'm a bit short of time this weekend for various reasons so I gave the half-inch chisel a bit of a flattening on the back and re-honed the long bevel edge on the front so I could try the chisel on some wood today.
From narex mortise chisels


I grabbed a piece of 2 x 4 Spruce stock , flattened the top with a Jack plane, and dropped the mortise with her one half-inch bit in my Triton router.
From narex mortise chisels

As shown in the following picture the half-inch mortise is an excellent fit to the half-inch router bit I am using and it actually took just a few seconds to square a each end of the of the mortise.
From narex mortise chisels
This is a picture of the finished mortise and although it is not a textbook example using a hardwood it has given me confidence to go ahead and finish honing the other four chisels.
From narex mortise chisels

The set consists of a 3/16, 1/4, 5/16, 3/8, and 1/2" chisels.
They come as shown with blade guards but do not include a fancy case which I generally end up tossing out anyway.
They're modestly priced and a pleasure to work with. I found mine at the Valley tools and I do understand that this brand from Czechoslovakia is also available at Highland woodworking in the US.

Using a Dadowiz for Routered Dados

One of the most difficult operations in my shop has been lining up dadoes consistently through two boards.
The most,common operation for this is to make book shelves that must bear considerable weight without warping.
the example shown here shows how I would go about ensuring my accuracy and controlling the depth of cut using a device called *Dadowiz.*

From dadowiz
#1 is the first piece of melamine
#2 is the second piece of melamine
#3 represents a shelf that is 7/8 inches thick
The pencil lines shown as #4 and #5 depict the intended location of the dado for both parts.

From dadowiz

This photograph shows me lining up to the 1/2 inch mark on the Dadowiz with the pencil mark on my material.
As shown here, Dadowiz can run on either the right or left hand side of the guide as required.

From dadowiz
Dadowiz is supplied with three steel pins that slide into three holes on the surface of the device. By loosening a set screw on top you can wedge the intended insert between these pins and set the width that your router bit will cut for you.
From dadowiz
I deliberately chose a board that was 7/8 of an inch thick to demonstrate how easy it is to make this adjustment. Normally most shelf material would be cut from three-quarter inch melamine which can vary in thickness depending on where it is manufactured. This poses several difficulties when setting a stacked dado in the table saw.

From dadowiz

This picture simply shows the router held by the clamping guide in the Dadowiz making the first pass through the melamine. I like to make one shallow pass in this material to minimize chipping at the interface. When cutting melamine it's best to use a spiral down cut carbide which I currently don't have in a 1/2 inch size. In this particular case I'm using a generic 1/2 inch double fluted router bit.
Also note that because the dado is being cut using a one-inch bushing in the router is independent of the router base and does not create difficulties in keeping the base lined up to the center of the router bit which happens most often using homemade router jigs.

From dadowiz
This picture shows the completed dado with the stop in the top board. This is a relatively simple task with this device as the and is already calibrated to lineup with my pencil mark. I just need to square the cut with a chisel and I'm done.

From dadowiz

This picture just shows the finished dado cut to the depth of 3/8 of an inch and spanning both members of the shelf.

From dadowiz

The final picture speaks for itself and shows the dry fit after the milling procedure is completed.
I'm not sure if the device I am using is still in production but I was informed that Woodline has a very similar device which they call the Dadomax that will accomplishes the same thing.

Saturday, May 8, 2010

Finally 1/4" extensions that hang on to the bits

Over the years I've probably purchased a half dozen different quarter-inch bit extensions all of which have failed for one reason or another. Either thay were too long or too short or too wobbly or just plain junk and end up frustrating me every time I attempted to use them.

This morning I went out to check a couple of vendors that supply these devices to see if there were any improvements.
The first store I checked had a set five but they were sealed in plastic and the sales clerk was too busy to answer some questions I had about them so I left. (they were probably rejects off some factory floor in China anyway.

I went to another tool store and the clerk I spoke to there had no clue about what was asking for. (Funny,I thought that would happen on the way over there)

Finally, I ended up at Lee Valley and found these extensions.
They're well-made they fit well and have a good durable finish and are definitely easy to spot in my toolkit.

From wood stuff 2010
.
Those little red hoods you see in the picture are spring-loaded and pull forward to insert a drill bit and slide back to lock it in place.

Here's a shot of the tip with the tool but in place.

From wood stuff 2010
The black part of the shaft is free from the main shaft and allows the shaft to rotate should you need to support the drive with your hand is shown in the next picture.

From wood stuff 2010

Should the need ever arise to have a 3 foot extension you can snap them all together and put a drill bit on the end of that. Just kidding.

From wood stuff 2010

Take 20 bucks with you if you are shopping for a set.

Thursday, May 6, 2010

Blotch control

It seems one of the most difficult tasks for woodworkers is finding a stain and finish system that's capable of giving consistent and durable results.
For many years I had used nitrocellulose lacquer for my projects with appropriate oil or water-based stains. One of the problems with lacquer is it is extremely volatile and subject to offgassing volatile organic compounds that could be dangerous from a health perspective.

With this in mind, I set out to try and adapt my system to replace the nitrocellulose system. One of my local suppliers was now carrying General Finishes brand so I purchased a sanding sealer, a stain,and a waterbased top coat.
In the past my custom was to lay down a sanding sealer to prevent watching them build up a stain coat over this base.
Much to my surprise, the result was a disaster with a very, very poor take on the stain.
I tried a test sample using the stain alone and found that I could not control the color and again was faced with blotching where the stain penetrated some areas of the wood more deeply than others.

I then contacted customer service and they suggested I was using the product all wrong and that I should stain first and then apply sanding sealer. I was disappointed with this result as well.


There well may be a way to use this product as suggested but I have exhausted my limited abilities at this point.

Quite unexpectedly, I ran across a video from our woodworking buddy Charles Neil who had just come up with a
From
I watched the video and was intrigued by the absolute simplicity of the product and how effectively it controlled the problem I was experiencing.

I immediately got on the blower and ordered some for my own use which arrived promptly a couple of days ago. I performed tests on the product as soon as I got it to be sure I was using it correctly and that I could accomplish the results that I needed.
To be perfectly honest, I am astounded with this product. Not only does it fill the wood sufficiently to balance the stain but it rminimally raises the grain making subsequent passes much quicker and easier to perform.

From blotch control
From blotch control
Here's a side-by-side comparison with the blotch control product on the right and the General Finishes on the left:
From blotch control
As you can see the results from General Finishes are far different from what I got using the Blotch Control as the first coat then the stain.(left sample) if you notice the sample on the right the stain at the top of the test is at least a shade lighter than the stain on the bottom. I applied a second coat of stain on the bottom to be sure I could build up the color if needed. As you can see, no streaking, no blotching!
Here's a close-up showing how well the grain in this piece of Alder is reflected through the stain and is actually enriched compared with the results on the left.
From blotch control
The other thing that I noticed was that the stain laid on top of the blotch control and seemed to maintain its color value better than the stain on the left which had mixed with the wood itself and actually gone off its original cherry coloring. Where I applied it over the sanding sealer it became quite streaky and blotchy. Not what I was looking for at all.

I'm confident enough at this point to go back to my current project(a folding chair/stool) and refinish it with this amazing product
Blotch Control as the backbone for my stain and topcoat.
I will keep you posted with the results.

At the request of the cyber pal of mine I hunted around the shop for piece of birch that I could stain to see how well the color/blotch control would work.
Birch is notorious for not taking stains well and for having very difficult grain pattern that can swing north to south in just a few inches along the board surface.
As luck would have it I did have a piece of Spalted birch that was well beyond its useful life wormholes and soft patches.
From blotch control
I sanded one side down with 80 grit paper and applied 2 coats of blotch control with a two-hour dryand light scuffing with a 3M fine abrasive pad between each coat.
Out of curiosity, I hand sprayed one side with a small brush and wiped the dye stain on the other half with a webril wipe.
From blotch control
From blotch control
This next shot just shows both sides of the wood after drying for a couple hours.
From blotch control
The artifacts you can see on this picture on the top left hand area (the five white spots) are from the lacquer) spill I did clearing off the bench for another project.
This wood is highly figured but despite that and the softness of the spalted areas evidence of blotching is virtually nonexistent.

To put an end to this blog for the time being I wanted to share a photo with you all that shows haw the colour is affected after the finish has bee applied.

The center of the picture has blotch control and stain only.
The top part is blotch control and nitrocellulose lacquer.
The bottom is blotch control and General Finishes Poly Urethane satin.

Also note tah some of the dye disolved into the waterbased poly in the bottom example which is probably why General tried to come out with a sealer.

From blotch control

Tuesday, April 13, 2010

Making a Franklin chair ( folding step stool)

I was fascinated with the duality of function that this chair/stool offered for our rathet modest kitchen and after much deliberation I made a stab at making one.
I found this particularly challenging as the plan I chose left a bit to be desired and some of the measurements were wrong making me go back and re-mill , recut and reglue. The 4/4 lumber I had available turned out to be 15/
From future projects 2010
16" which gave me frightmares trying to mill it to 12/16"(3/4")


From future projects 2010
Here's pic of the chair flipped over for use as a step stool.

From future projects 2010

Sunday, March 21, 2010

Pimping out an imported Woodplane

I figured it was about time I tried to tweak a new plane. These planes were made in India, under the award brand, but they look very similar to those made by "GrozIndustries":"
ambika"
and"Anant tools":
etc.

I purchased these three planes at a local store here for from $15.00 to $40 each.
Having attempted to restore several old Bailey's and Sargents and Stanley's I found that
lately the prices on E-bay for vintage tools has been tarnished by extremely high shipping costs and the inevitible "padding" of the price by shady merchants. And to be quite honest, in my opinion, they were not made all that well in the first place. (Your milage may vary)

Right out of the box, these all performed much better than my expectations and required no adjustment of the plane bases and or blade fittings. The castings, seem of very high quality, and did not require any adjustment.

I sharpened the blade in the No.6 plane (18" long), and used it on several different species of wood and was impressed with how well it cut.
I was curious to find out what improvement a *high end blade* would make with this plane so I ordered a new blade from Lee Valley made from A2 steel.
As you may know, A2 steel is much harder than 01 carbon steel and although more difficult to sharpen it keeps an edge longer. I have a "Worksharp, sharpening system ":http://lumberjocks.com/jocks/boboswin/blog/2399 so I was not too concerned about the extra work in sharpening this type of blade. As shown in the picture the Lee Valley blade is considerably thicker than the original. Lee Valley claims this extra thickness helps prevent chatter from the blade.

Next I removed the blade and chip breaker and gently filed the frog so that it was continuous with the angle formed in the sole of the plane. It went fairly quickly, as there was negligible material that needed to be removed.

Next, I set out my sharpening station and set the blade angle to 25° using the wixey gauge to get an accurate angle.


The next shot shows the blade, as it comes off the Worksharp system.


I reassembled my plane and tested it out with a handy stick on the shooting board. The new blade got noticeably smoother than the original and the additional thickness narrowed the mouth of the plane leaving just enough room for those fine shavings to exit.


I'm very satisfied with this modification to the original plane and hope to modify the other two in the weeks to come. I will admit that the new blades actually cost more than the original plane. But all in all, it turns out to be very good value.

I am the first to admit that they are not the same quality as a Lee Valley or a Lie Neilson but they will certianly do until I win the next lotto.