Sunday, October 21, 2012

Using a Trephine to remove broken screws in Wood

If you do any furniture repair you have probalby come cross a screw or nail that has broken off flush with the wood surface.
Digging it out with prys or pliers generally damages the surrounding wood severely and can compensate the repair.

Enter the Trephine.

Borrowed from the medical and dental field this hollow steel tube sharpened with saw teeth can accurately core out a small section of the surrounding wood leaving a concentric hole that is easily repaired with a dowel plug.
Trephines currently come in 3 sizes and will handle most screws or nails found in common furniture products.
Here's an example of how they are used.
This picture shows a screw broken off flush with the end of a rung. If you have trouble centering the trephine cut a small guide hole in plywood scrap with the trephine and mount that with double sided tape to the top of the rung.
When the surface is cleaned to allow the drill to sit flush against the rung the trephine is gently pressed into the surface with short drill bursts and allowed to clear the debris before continuing.
Once the screw has been tunneled along it's entire length you can use a sharp instrument to pry away the wood between the screw and the kerf until the screw frees up.
Here the screw is out and the hole debrided you can fit a length of doweling in the hole or custom
 turn a matched piece if the repair will show.
 
A narrow chisel will take care of the remaining splinters by twisting it in the channel. If you have a suitable drill bit you can try this as well.


Once the screw is out and the hole debrided you can fit a length of doweling in the hole or custom
turn a matched piece if the repair will show.
Here's the finished repair ready for a new screw or nail.
I purchased mine from Highland woodworking . You'll find them under screw extractors.
 

Sunday, May 20, 2012

Taming tear out on finger joints - Baltic Birch plywood

I’ve become accustomed to using quarter inch plywood with finger joints to build storage boxes for some of my tools.The reason I chose this method is that by using finger joints I don’t require any additional support for the box and given the rather thin quarter inch exterior is not a lot of room for additional support for dadoes or splines.


Most recently, I purchased a new sheet of quarter inch Baltic Birch. The stamp on the material tells me it came from Eastern Europe and quite possibly Russia.

I ran into a problem with the sheet in that there was  unreasonable amount of tearout while cutting and milling the product. Repeated attempts to cut a joint that at least, could serve as a storage box in the shop led to disappointment. The wood splintered, it chipped front and back, the internal layers between fractured and fell out.
In frustration, I gathered up a couple of samples and tossed the rest of the sheet into the truck and returned to my supplier. They explained to me that they "had not had any complaints except for mine" regarding this product and suggested that I tape both sides of the joint with painters tape and or use sacrificial wood strips on either side of the joint.

I returned home rather disappointed and patched up enough wood for the project to put it bed for the time being.
 Today I had another opportunity to go over my work and take a very close look at the bits I was using to cut the joints.
I had tried a single blade quarter inch a double bladed blade quarter inch on 1/4 inch shaft as well as a double blade quarter inch on a half-inch shaft. In addition I used a 1/4 inch solid carbide spiral up cut carbide all without reasonable improvement.


I began to think that there must be something in the process of making the plywood that made it different from other batches I had used over the years. There were the same number of plies as before and the thickness of the Baltic Birch itself was dead on one quarter of an inch so I ruled that out. I tried to see if the material used inside the plywood was different from what I’d use previously but was unable to tell from such a small sample. The internal layers where breaking off as I milled the finger joints so they were either made from a very brittle wood or the glue used to binding the layers was more brittle than I was used to.

I decided to try longshot, I got a small spray bottle, put some water in it and lightly sprayed both sides of a test sample.
There was just enough moisture there to be visible to the naked eye and I used paper towel to remove the excess.I let the wood set for about five minutes in order to have the moisture penetrate and proceeded to mill several joints.
Surprisingly, this method worked and I was able to mill about 10 joints without a single joint exploding against the bit.
I think at this point, I could recommend this method to help overcome brittle wood when cutting dovetails keys or finger joints. I also found tear out along the table saw cuts as well and if you’re having trouble there you might try this method as well.

I have concluded that the wood used is not as good as it  once was and that the filler layers may be substandard for this purpose. I also wonder if the wood had been subject to undue heat and pressure in order to speed up the manufacturing process and increase profits. At any rate the material cuts like glass and needs every precuation to prevent tearout. For the time being, this seems to work for me.

Sunday, June 5, 2011

DeWalt DWP611PK 1-1/4 hp Router Kit

From dw611 router kit

Having first seen this router on the United States Dewalt website last October, I was finally able to track one down here in Canada June 5, 2011.
(7 months later)
Compact routers are great for working with trim, laminates, veneers and many other types of precision woodworking tasks. They're easy to use and maneuver, and offer power enough to tackle a wide variety of projects. The DeWalt DWP611 Variable Speed Compact Router is a true stand out in the compact router category. It features a powerful 1.25 HP motor that will breeze through even the most demanding tasks, and the variable speeds allow you to dial in just the right amount of power the job calls for. The soft start features will reduce the chances of chipping and cracking during startup, and the electronic feedback control helps maintain consistent motor speed throughout the cut. The key to router accuracy is a good view of the cut area, and the DWP611 offers 2 bright LED's and a clear sub base that combine to give you the clear view you need for the most accuracy possible. The DeWalt DWP611 Variable Speed Compact Router is a feature rich and affordable way to take your woodworking projects to the next level.


From dw611 router kit
A very well put together video by Gord Graff convinced me that this would be my go to router system for small jobs not requiring a router table. I was also interested in something lighter in weight that I could use with my Leigh dovetail jig.
Yesterday I unpacked the router and briefly reviewed the accompanying instructions.
I understand that there are accessories for this router system but they are poorly described in the brochure and apparently not described at all on the website.
I did ask when I purchased the kit if the dealer had been given additional information but apparently they had not.
The accessories I am refering to are pretty much standard fare for routing in today's world. I was expecting information about fence system and further information regarding dust collection which at present,the world considers "optional". I was not expecting these options free but could have used the part numbers for them to obtian info and availabilty.
I did find out from the brochure that in order to equip both the fixed base and the plunge base I will require two fences and two dust collection cups. As there are no part numbers for these accessories the task will be daunting given my experiences over the last seven months with the DeWalt website and their Canadian representatives here in the West.
I managed to find a fence from another router that fits the plunge base but nothing for the fixed base as yet.
From dw611 router kit
Breaking up the kit
The 1-1/4 HP router motor assembly comes with two built-in LED lights. I've found that because of their position and the angle of the lights themselves that they only will illuminate the working area so long as the distance from the motor to the product is greater than 1 inch
From dw611 router kit
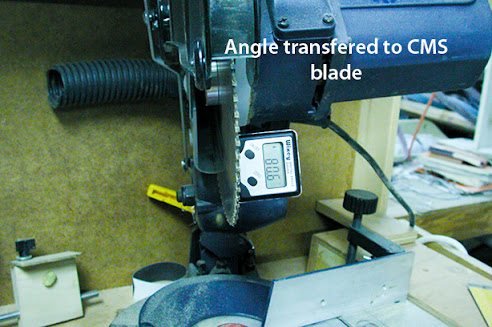
Any closer than that and there is no illumination at all around cutting bit. That was one of the features that I was looking forward to with this product and it's surprising that this was not addressed. This will be a problem for those of us that use a jig between the router and the work piece as illustrated here:

From dw611 router kit
I realize that from an engineering perspective they probably had to be machined where they currently sit but it would have been nice had they injection molded a light deflecting prism to reflect the light more directly on the work area. Also I noticed right away that it would've been helpful for set up if the lights could be turned on and off without starting the router motor. They are currently connected to the on-off switch. This makes setting up for a cut harder than it should be.
Both bases are simple to remove from the motor and easy to adjust.
I like the variable speed and the soft start on the motor as it gives me lots of control over cut rates and over heating of bits in some circumstances.

Incidently, at time of writing this blog the best information for spare parts and accessories seems to be Toolsplus.com Kudos for taking the time to help out the consumer.

What I have now is an extra fence for the fixed and plunge router and a centering device to fix the base for use with a guide bushing.
From dw611 router kit


The auxilary fence is relativley striaght forward to assemble.
From dw611 router kit

You have to remove the 4 screws on plastic base to install the fence to the casting and reverse the process to remove it.
No you don't!
After assembling the jig and taking a closer look at the sub base I find that there are indeed two holes in the base through which I can screw on the auxillary fence. I would be embarrassed with the oversight had I not read the non exisitent instructions.
The unit ( mine) was shipped with the fence positioned upside down. -A bummer for the newbies.
I have no idea what the metric and imperial rulers are supposed to measure. There seems no zero point???

The fence provided for the plunge router base is adapted to fit the Dewalt track saw track and, as such, becomes an expensive substitute for a simple fence.( around $49.00) I managed to find an orphan fence in my tools that will suffice for this router rather than spend another $50 for yet another accessory.

From dw611 router kit

The base centering spindle affair is pretty straight forward but I can't see how it is an "extra" accessory given the fact that you need something to center the base should you ever need to remove it.

From dw611 router kit


Lastly the dust collection cup is now being ordered as it was not listed with the other accessories and the fellow that helped me had to google it to find a part number before he could search the Dewalt tools database to order it.
Somebody at Dewalt needs to review the parts lists and the website to get the information out to the endusers. The dealers say they have no info and don't stock parts and the parts and service say they normally dont stock parts for new products. I find this a bit confusing.

While waiting for the dust collection cup to arrive from Dewalt I ran a box to contain the router , bases and extras to hopefully avoid misplacing parts of the system. The kit came with a small canvas bag but I gave it to my wife to hold her battery cables in her car.
From dw611 router kit
I photostated the cover from the cardborad shipping box and glued them to the boxe. Using finger joints I was able to build the box with 1/4" fir plylwood and finger joints with a sliding lid.
From dw611 router kit
I made up a box for my Fein Muti tool as well.
From

Tuesday, May 17, 2011

Narex mortise Chisels Set of 5

I bought a five piece set of Narex mortise chisels and so far have had an opportunity to actual work with one.
I'm quite pleased with the fit and finish and this steel quality which seems to be just right for my liking. Not too brittle, takes an edge quickly and seems to sharpen without leaving too much curl on the cutting-edge.(Rc59) They have a nice weight to them in a nice feel in my hand and the blades are definitely long enough to be able to hold the blade in alignment while gently tapping the butt to form the mortise.
From narex mortise chisels

I'm a bit short of time this weekend for various reasons so I gave the half-inch chisel a bit of a flattening on the back and re-honed the long bevel edge on the front so I could try the chisel on some wood today.
From narex mortise chisels


I grabbed a piece of 2 x 4 Spruce stock , flattened the top with a Jack plane, and dropped the mortise with her one half-inch bit in my Triton router.
From narex mortise chisels

As shown in the following picture the half-inch mortise is an excellent fit to the half-inch router bit I am using and it actually took just a few seconds to square a each end of the of the mortise.
From narex mortise chisels
This is a picture of the finished mortise and although it is not a textbook example using a hardwood it has given me confidence to go ahead and finish honing the other four chisels.
From narex mortise chisels

The set consists of a 3/16, 1/4, 5/16, 3/8, and 1/2" chisels.
They come as shown with blade guards but do not include a fancy case which I generally end up tossing out anyway.
They're modestly priced and a pleasure to work with. I found mine at the Valley tools and I do understand that this brand from Czechoslovakia is also available at Highland woodworking in the US.

Wednesday, February 2, 2011

Modifying trim routers for template gauges.


I find that my big 2 and 3 hp routers are not up to the delicate task of routing patterns or inlays .
I was not prepared to ad yet another dedicated tool to my arsenal to I decided to modify a couple of my weapons to accept brass bushing's biggest problem for me was getting the bushing set dead center over the chuck and the template base drilled to exactly holed that position when screwed back on the base. Trial and error lead me to use the centering pin shown here to mark center then drill the template hole first.


Now, inserting the template guide baking to the lexan I could mark and drill for the set screws. In thus situation I am making the jig to retrofit my Rotozip general purpose trimmer.. It just sits in the shop most of the time as it was limited to 2-3 tasks and now can handle a 4th.I used two sheets of lexan here, One has a cut out to receive the Rotozip base and the other forms the base with the hole for the bushing. I joined them together with epoxy. the base has yet to be trimmed down as the epoxy was slow setting yesterday with the humidity.Heres the completed jig for the router zip:That's piece of scrap aluminum with set screws to hold the front of the jig where the metal strip at the back holds the guide when attached to the black screw on the height adjustment. This one is fitted to a cheap under $40.00 router that is ultra light with variable speed. I can get a larger bit in here to hog out the inside of a pattern quickly then switch to the inlay bit to refine the edges for the actual inlay.I suppose I could have been a bit neater but it works.So why did I do this?Here's what I am trying to get perfected; Iwant to be able to cut a pattern quickly and efficiently without a lot of bit changes and or the possibility of running out of the pattern.I felt I needed more tactical control than I was getting with full sized routers.I'm not quite spot on but the results are encouraging.

Tuesday, January 18, 2011

Making an Octagonal Bird feeder.

I haven't blogged before so bear with me while I find out where the rocks are.

It looks like I managed to get pictures in here so here goes the story:

BTW, that is a Downey woodpecker doing a close up investigation.

I have been fussing with critters all my life and birds are among my favourites.
By attracting them I gain the benefit of their company and the side benefit of their constant insect control.
These feeders are 8 sided and fun to build in the shop.
I have found some work arounds for the windows and the feed area that could save you some time.
I like to keep a piece of cut stock from a previous feeder to use as a guide to set up my saw
For future cuts but I am finding that this wixey angle gauge is taking a lot of the set up time out of the job.
Now I just set the angle off the number of segments and let the Wixey figure out the compound angle for the saw.
Here's how it works:
1.Take the angle off an old segment as I do here or calculate it from a table.
there are numerous on the net and some in Excel if you prefer.


2. Set the Wixey on the saw table and zero it out.


3. Using a steel miter gauge set the Wixey on it a measure the angle difference vs the table and the gauge.
Transfer the Wixey to your saw blade and set in the same angle you got from the bevel gauge.


The diameter of your roof will vary with the stock you choose but the angle of slope will remain the same.

4. Saw up 4 pieces and set them with masking tape against a flat board and check your fit.
Adjust if necessary.
If they are a fit, cut the other 4 pieces and get ready to glue them.
You pretty much should use polyurethane glue ( Elmers or Gorilla for example) to get a weather proof seal as Most of the joints are end grain and will be sitting in moisture alot.
Wear gloves with this Stuff, it stains your hands.
Use it sparingly and spray the glued surface with water to hasten the cure.
I apply the glue on one surface and wet the mating surface.


to be continued...