http://www.members.shaw.ca/boboswin/public/WixeyBevelgaugeobservations/
WixeyBevelgaugeobservations
Thursday, August 11, 2011
Sunday, June 5, 2011
DeWalt DWP611PK 1-1/4 hp Router Kit
 |
| From dw611 router kit |
Having first seen this router on the United States Dewalt website last October, I was finally able to track one down here in Canada June 5, 2011.
(7 months later)
Compact routers are great for working with trim, laminates, veneers and many other types of precision woodworking tasks. They're easy to use and maneuver, and offer power enough to tackle a wide variety of projects. The DeWalt DWP611 Variable Speed Compact Router is a true stand out in the compact router category. It features a powerful 1.25 HP motor that will breeze through even the most demanding tasks, and the variable speeds allow you to dial in just the right amount of power the job calls for. The soft start features will reduce the chances of chipping and cracking during startup, and the electronic feedback control helps maintain consistent motor speed throughout the cut. The key to router accuracy is a good view of the cut area, and the DWP611 offers 2 bright LED's and a clear sub base that combine to give you the clear view you need for the most accuracy possible. The DeWalt DWP611 Variable Speed Compact Router is a feature rich and affordable way to take your woodworking projects to the next level.
| From dw611 router kit |
Yesterday I unpacked the router and briefly reviewed the accompanying instructions.
I understand that there are accessories for this router system but they are poorly described in the brochure and apparently not described at all on the website.
I did ask when I purchased the kit if the dealer had been given additional information but apparently they had not.
The accessories I am refering to are pretty much standard fare for routing in today's world. I was expecting information about fence system and further information regarding dust collection which at present,the world considers "optional". I was not expecting these options free but could have used the part numbers for them to obtian info and availabilty.
I did find out from the brochure that in order to equip both the fixed base and the plunge base I will require two fences and two dust collection cups. As there are no part numbers for these accessories the task will be daunting given my experiences over the last seven months with the DeWalt website and their Canadian representatives here in the West.I managed to find a fence from another router that fits the plunge base but nothing for the fixed base as yet.
| From dw611 router kit |
The 1-1/4 HP router motor assembly comes with two built-in LED lights. I've found that because of their position and the angle of the lights themselves that they only will illuminate the working area so long as the distance from the motor to the product is greater than 1 inch
| ||
| From dw611 router kit |

| ||
| From dw611 router kit |

| From dw611 router kit |
Both bases are simple to remove from the motor and easy to adjust.
I like the variable speed and the soft start on the motor as it gives me lots of control over cut rates and over heating of bits in some circumstances.
Incidently, at time of writing this blog the best information for spare parts and accessories seems to be Toolsplus.com Kudos for taking the time to help out the consumer.
What I have now is an extra fence for the fixed and plunge router and a centering device to fix the base for use with a guide bushing.
 |
| From dw611 router kit |
The auxilary fence is relativley striaght forward to assemble.
 |
| From dw611 router kit |
You have to remove the 4 screws on plastic base to install the fence to the casting and reverse the process to remove it.
No you don't!
After assembling the jig and taking a closer look at the sub base I find that there are indeed two holes in the base through which I can screw on the auxillary fence. I would be embarrassed with the oversight had I not read the non exisitent instructions.
The unit ( mine) was shipped with the fence positioned upside down. -A bummer for the newbies.
I have no idea what the metric and imperial rulers are supposed to measure. There seems no zero point???
The fence provided for the plunge router base is adapted to fit the Dewalt track saw track and, as such, becomes an expensive substitute for a simple fence.( around $49.00) I managed to find an orphan fence in my tools that will suffice for this router rather than spend another $50 for yet another accessory.
 |
| From dw611 router kit |
The base centering spindle affair is pretty straight forward but I can't see how it is an "extra" accessory given the fact that you need something to center the base should you ever need to remove it.
 |
| From dw611 router kit |
Lastly the dust collection cup is now being ordered as it was not listed with the other accessories and the fellow that helped me had to google it to find a part number before he could search the Dewalt tools database to order it.
Somebody at Dewalt needs to review the parts lists and the website to get the information out to the endusers. The dealers say they have no info and don't stock parts and the parts and service say they normally dont stock parts for new products. I find this a bit confusing.
While waiting for the dust collection cup to arrive from Dewalt I ran a box to contain the router , bases and extras to hopefully avoid misplacing parts of the system. The kit came with a small canvas bag but I gave it to my wife to hold her battery cables in her car.
 |
| From dw611 router kit |
 |
| From dw611 router kit |
 |
| From |
Tuesday, May 17, 2011
Narex mortise Chisels Set of 5
I bought a five piece set of Narex mortise chisels and so far have had an opportunity to actual work with one.
I'm quite pleased with the fit and finish and this steel quality which seems to be just right for my liking. Not too brittle, takes an edge quickly and seems to sharpen without leaving too much curl on the cutting-edge.(Rc59) They have a nice weight to them in a nice feel in my hand and the blades are definitely long enough to be able to hold the blade in alignment while gently tapping the butt to form the mortise.
I'm a bit short of time this weekend for various reasons so I gave the half-inch chisel a bit of a flattening on the back and re-honed the long bevel edge on the front so I could try the chisel on some wood today.
I grabbed a piece of 2 x 4 Spruce stock , flattened the top with a Jack plane, and dropped the mortise with her one half-inch bit in my Triton router.
As shown in the following picture the half-inch mortise is an excellent fit to the half-inch router bit I am using and it actually took just a few seconds to square a each end of the of the mortise.
This is a picture of the finished mortise and although it is not a textbook example using a hardwood it has given me confidence to go ahead and finish honing the other four chisels.
The set consists of a 3/16, 1/4, 5/16, 3/8, and 1/2" chisels.
They come as shown with blade guards but do not include a fancy case which I generally end up tossing out anyway.
They're modestly priced and a pleasure to work with. I found mine at the Valley tools and I do understand that this brand from Czechoslovakia is also available at Highland woodworking in the US.
I'm quite pleased with the fit and finish and this steel quality which seems to be just right for my liking. Not too brittle, takes an edge quickly and seems to sharpen without leaving too much curl on the cutting-edge.(Rc59) They have a nice weight to them in a nice feel in my hand and the blades are definitely long enough to be able to hold the blade in alignment while gently tapping the butt to form the mortise.
 |
| From narex mortise chisels |
I'm a bit short of time this weekend for various reasons so I gave the half-inch chisel a bit of a flattening on the back and re-honed the long bevel edge on the front so I could try the chisel on some wood today.
 |
| From narex mortise chisels |
 |
| From narex mortise chisels |
I grabbed a piece of 2 x 4 Spruce stock , flattened the top with a Jack plane, and dropped the mortise with her one half-inch bit in my Triton router.
 |
| From narex mortise chisels |
As shown in the following picture the half-inch mortise is an excellent fit to the half-inch router bit I am using and it actually took just a few seconds to square a each end of the of the mortise.
 |
| From narex mortise chisels |
 |
| From narex mortise chisels |
The set consists of a 3/16, 1/4, 5/16, 3/8, and 1/2" chisels.
They come as shown with blade guards but do not include a fancy case which I generally end up tossing out anyway.
They're modestly priced and a pleasure to work with. I found mine at the Valley tools and I do understand that this brand from Czechoslovakia is also available at Highland woodworking in the US.
Wednesday, February 2, 2011
Modifying trim routers for template gauges.


I find that my big 2 and 3 hp routers are not up to the delicate task of routing patterns or inlays .
I was not prepared to ad yet another dedicated tool to my arsenal to I decided to modify a couple of my weapons to accept brass bushing's biggest problem for me was getting the bushing set dead center over the chuck and the template base drilled to exactly holed that position when screwed back on the base. Trial and error lead me to use the centering pin shown here to mark center then drill the template hole first.
Now, inserting the template guide baking to the lexan I could mark and drill for the set screws. In thus situation I am making the jig to retrofit my Rotozip general purpose trimmer.. It just sits in the shop most of the time as it was limited to 2-3 tasks and now can handle a 4th.I used two sheets of lexan here, One has a cut out to receive the Rotozip base and the other forms the base with the hole for the bushing. I joined them together with epoxy. the base has yet to be trimmed down as the epoxy was slow setting yesterday with the humidity.Heres the completed jig for the router zip:That's piece of scrap aluminum with set screws to hold the front of the jig where the metal strip at the back holds the guide when attached to the black screw on the height adjustment. This one is fitted to a cheap under $40.00 router that is ultra light with variable speed. I can get a larger bit in here to hog out the inside of a pattern quickly then switch to the inlay bit to refine the edges for the actual inlay.I suppose I could have been a bit neater but it works.So why did I do this?Here's what I am trying to get perfected; Iwant to be able to cut a pattern quickly and efficiently without a lot of bit changes and or the possibility of running out of the pattern.I felt I needed more tactical control than I was getting with full sized routers.I'm not quite spot on but the results are encouraging.
Tuesday, January 18, 2011
Making an Octagonal Bird feeder.
I haven't blogged before so bear with me while I find out where the rocks are.

It looks like I managed to get pictures in here so here goes the story:
BTW, that is a Downey woodpecker doing a close up investigation.
I have been fussing with critters all my life and birds are among my favourites.
By attracting them I gain the benefit of their company and the side benefit of their constant insect control.
These feeders are 8 sided and fun to build in the shop.
I have found some work arounds for the windows and the feed area that could save you some time.
I like to keep a piece of cut stock from a previous feeder to use as a guide to set up my saw
For future cuts but I am finding that this wixey angle gauge is taking a lot of the set up time out of the job.
Now I just set the angle off the number of segments and let the Wixey figure out the compound angle for the saw.
Here's how it works:
1.Take the angle off an old segment as I do here or calculate it from a table.
there are numerous on the net and some in Excel if you prefer.

2. Set the Wixey on the saw table and zero it out.
3. Using a steel miter gauge set the Wixey on it a measure the angle difference vs the table and the gauge.
Transfer the Wixey to your saw blade and set in the same angle you got from the bevel gauge.

The diameter of your roof will vary with the stock you choose but the angle of slope will remain the same.
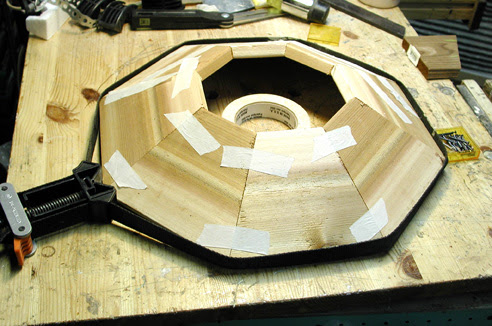
4. Saw up 4 pieces and set them with masking tape against a flat board and check your fit.
Adjust if necessary.
If they are a fit, cut the other 4 pieces and get ready to glue them.
You pretty much should use polyurethane glue ( Elmers or Gorilla for example) to get a weather proof seal as Most of the joints are end grain and will be sitting in moisture alot.
Wear gloves with this Stuff, it stains your hands.
Use it sparingly and spray the glued surface with water to hasten the cure.
I apply the glue on one surface and wet the mating surface.
to be continued...
It looks like I managed to get pictures in here so here goes the story:
BTW, that is a Downey woodpecker doing a close up investigation.
I have been fussing with critters all my life and birds are among my favourites.
By attracting them I gain the benefit of their company and the side benefit of their constant insect control.
These feeders are 8 sided and fun to build in the shop.
I have found some work arounds for the windows and the feed area that could save you some time.
I like to keep a piece of cut stock from a previous feeder to use as a guide to set up my saw
For future cuts but I am finding that this wixey angle gauge is taking a lot of the set up time out of the job.
Now I just set the angle off the number of segments and let the Wixey figure out the compound angle for the saw.
Here's how it works:
1.Take the angle off an old segment as I do here or calculate it from a table.
there are numerous on the net and some in Excel if you prefer.
2. Set the Wixey on the saw table and zero it out.
3. Using a steel miter gauge set the Wixey on it a measure the angle difference vs the table and the gauge.
Transfer the Wixey to your saw blade and set in the same angle you got from the bevel gauge.
The diameter of your roof will vary with the stock you choose but the angle of slope will remain the same.
4. Saw up 4 pieces and set them with masking tape against a flat board and check your fit.
Adjust if necessary.
If they are a fit, cut the other 4 pieces and get ready to glue them.
You pretty much should use polyurethane glue ( Elmers or Gorilla for example) to get a weather proof seal as Most of the joints are end grain and will be sitting in moisture alot.
Wear gloves with this Stuff, it stains your hands.
Use it sparingly and spray the glued surface with water to hasten the cure.
I apply the glue on one surface and wet the mating surface.
to be continued...
Sunday, January 16, 2011
Thin strip table saw gauge
I needed a jig to allow me to cut consistent thin strips away from the fence and the potential for binding and possbly nicking the fence. I have the Grr ripper but sometimes need a strip too narrow for this jig.(1/4" minimum)
I saw this in ShopNotes or similar and never got around to making it.
It's really simple and only needs a routed slot and a bolt to carry a small bearing on the nose. I picked up the miter slot fittings from Workshop Supply here in Canada.
You can fine tune this with measuring bars and cut strip after strip just by moving the fence in to the bearing surface.
If you use the Grr-ripper you can set it way back and set the Gripper up ahead of it to carry the cut through the blade.
Bob
 |
| From THIN STRIP TS JIG |
I saw this in ShopNotes or similar and never got around to making it.
It's really simple and only needs a routed slot and a bolt to carry a small bearing on the nose. I picked up the miter slot fittings from Workshop Supply here in Canada.
 |
| From THINS STRIP TS JIG |
 |
| From THINS STRIP TS JIG |
 |
| From THINS STRIP TS JIG |
Bob
Thursday, January 13, 2011
Working punky wood in a maple burl
These pics tell the whole story.
The fellow that trims my trees around home dropped off this huge burl about 2 years ago.
This is about 1/4 of it so far.
I just keep running out of time .
Time is not my friend.
Bob
The fellow that trims my trees around home dropped off this huge burl about 2 years ago.
This is about 1/4 of it so far.
I just keep running out of time .
Time is not my friend.
Bob
Subscribe to:
Posts (Atom)